Winding Road’s Guide to Automotive Video Recording
Over at the Winding Road YouTube channel viewers often ask us about how we capture the footage of the cars we review, both in terms of the equipment we use and how we use it. Previously we made a video outlining some of the gear in our arsenal, but we wanted to also offer a more in-depth look at the process and techniques used to get our footage. Recording video of your car may seem like a pretty straightforward proposition, but getting good results requires some forethought and the right tools for the job. In this article we’ll cover both, as well as how to handle situations that might necessitate changing your recording style due to outside factors.
Video
The first thing to consider when filming driving footage is camera angle. GoPros can be mounted just about anywhere, but that doesn’t necessarily mean that they should be. Here at Winding Road, we want the camera angle or angles to give the viewer as much information about the driving experience as possible. We like to see the steering wheel, the shifter (if possible), and a decent view outside the car. If you have an extra camera, you can never go wrong with a shot of the tachometer. Note that these are all elements that the driver directly interacts with when driving. This is why a driver’s point of view (POV) angle works so well, because it has all of these "driving involvement elements" in one shot. To that end, we like to use the Liquid Image Torque camera goggles to record POV footage whenever possible, as they provide the closest approximation of the driver’s point of view that we’ve come across in an action camera design. However, there are situations where the camera goggles can’t be used (with a helmet, for instance) and you may already have a mountable camera you’ve been using, so knowing where to mount those is very important when it comes to getting good results.
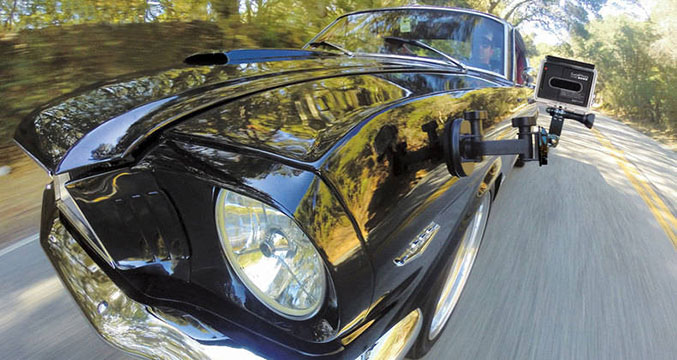
Not many people experience a car driving around a racetrack from a roof-top, fender/tire, or bumper cam view and live to tell about it. Yet everyone seems to use these camera angles in their videos while generally ignoring the driver’s view. That isn’t to say that a camera angle from the front bumper, roof, or the front fender with the suspension working and tire rolling over isn’t a nice touch to a video, but these same camera angles appear over and over in car videos.
Some of the best track and racing videos we’ve seen on YouTube are by Mike Skeen.
In additional to being a great racing driver, his videos all have pretty good camera angles and great audio, and therefore give insight into the driving experience. One could argue that they also educate the viewer on car control, racing lines, passing techniques, and race strategy.
Let’s take a closer look at some of our preferred camera mounting techniques:

GoPro Helmet Mounting – This angle is pretty close to POV with a helmet on. Sometimes it can be a little bit shaky, and of course you’re going to see a bit of the side of your helmet in the shot. You also have to bring your own helmet to the event because the GoPro is hard mounted to the side with one of the 3M sticky mounts. Here’s an example video.

GoPro Mounting Location 1 – This is one of my favorite angles for track footage, because it shows the shifter, steering wheel, and a view outside the track. That said, your results may vary. You need to pay attention to the camera angle, and sometimes it’s hard to get right. Ideally you want the steering wheel in the far left, the shifter at the bottom, and a good view outside the car. The GoPro is mounted on the passenger window, depending on your mount it might need to be hung upside down. The disadvantage is that it doesn’t show that great of a view of the track.

GoPro Mounting Location 2 – This isn’t a bad mounting spot either because it’s pretty close to the driver’s POV – though it can get in the way of your helmet depending on how cramped the cockpit is. GoPro is mounted on driver’s side window, just next to your head. Depending on your mount, it may need to be upside down.

GoPro Mounting Location 3 – Mounted to the sunroof and hung upside down to achieve as low of an angle as possible. Obviously this isn’t going to be possible with some cars that lack a sunroof. We like this angle a lot because it shows a lot of information. It’s pretty similar to Mike Skeen’s videos too. He usually mounts his camera to a roll bar in the middle of the car, just behind the front seats.

GoPro Mounting Location 4 – Mounted to my personal helmet, just above the visor (my visor is removed). This is my go-to POV setup for when goggles won’t fit under my helmet. 3M-mounted to the chin of the helmet, just below the visor, also works well. The idea is to get it as close to your eye level as possible without obstructing your vision.
Note that all of these camera angles are in-car. So if you just have a GoPro or a Liquid Image EGO to setup, they will also capture acceptable audio with the windows up.
Be sure to have the correct mount for the shot you need. Those GoPro L brackets and extension mounts can be a pain. I’ve found something like this suction mount to be the easiest solution.
Also, I usually try to get comfortable with the car and track first, before I even press record. Running out of battery or card space once you’re getting into the rhythm is a bummer.
Audio
This is a tough one, mostly because it adds another level of complexity to filming. Usually when we’re on track, time is tight, we’re focused on the task at hand, and we just want to get out there. Our minds aren’t primed for thinking about merging together audio/video tracks, securing mics, pressing record on multiple devices, wondering if the battery will last through the session, and if there’s enough space left on the SD card. But if you’re ready to take on another step in addition to setting up a go pro in the car, here are some tips and ideas for getting higher quality audio for your videos.
The best solution I’ve found to any in-car recording situation is the in-ear binaural microphones and Zoom H2N. If you’re not wearing a helmet, you can add in some earmuffs to eliminate wind buffeting. Properly secured, they should stay on your ears under a helmet. The H2N’s settings for this setup are very specific for consistent results.
If you have two GoPros, they can be used simultaneously to get an exterior angle (roof-top or driver’s side b-pillar view) and to record exhaust audio. The gopro mounted near the exhaust needs to be in a low pressure area like the rear bumper or next to the license plate.
It usually sounds pretty good. We filmed that with a GoPro Hero2 and Micover stickover windscreen. For our purposes, exterior angles should be take a back seat to interior shots because of the reasons discussed above.
If you have a smartphone, iTalk Recorder is another option. It’s a very easy to use and high-quality recording app, the $1.99 version can also be linked to any Dropbox account for easy file transfer.
Here’s an example of audio recorded with an iPhone in my pants pocket. You can hear fabric noise every time I shift, but it’s better than wind noise with the windows down.
When possible, a better solution is to mount your phone to something in the car. A few ideas for temporary mounting:
· Wedge it in a headrest
· Attach it via rubber bands to the sun visor
· Use a suction cup phone mount on the front windshield
If wind noise with your phone is a problem, cutting a slit in a piece of foam like this and placing the mic end of your phone inside is an easy solution. Just be sure that the foam and the phone are secured so that they don’t move around.
The best place to mount the phone is as close to ear level as possible. Wedging it in the headrest with the mic facing forward is a good option. Placing the phone in the cup holder or down near the center console is okay, but this usually results in greater road noise and especially loud shifter noise when changing gears or putting the car into gear.

A general rule of thumb for recording audio separately from video is to include a point of reference or merge point in both the audio or video tracks. In my videos, with both audio and video devices recording, I do this by saying the name of the car, what video number I’m recording for that car, and I clap my hands. The clap gives me an easy point of reference in editing to merge the tracks. Honking your horn, closing a door, and clapping hands all do the trick. Also, if you’re trying anything new, such as a new camera angle, new mic placement, etc. Test it out briefly beforehand and review your footage so that when you do it for real you already know what works.
So take these guidelines for recording and give them a try on your own ride. Remember, practice makes perfect, and as you get a better understanding of what works and what doesn’t, your results will inevitably improve.
If you have any questions or tips of your own about how to record your car, drop us a line in the comments!
Shop


Most Popular


